How to Install a Flagpole (Part 2 of 6)
 |
| Before |
Installing a
flagpole can be a great project for an
eagle scout, home owner, church, country club, or business. In
part one, we talked about how to remove an old flagpole. We also addressed the best flagpole location for the property. Sometimes, where the flagpole has been for decades is not the best place for the flagpole today. A little investigation goes a long way.
This tutorial assumes you have found the right flagpole for you and are ready to dig the hole and get started with installation.
In this case, we have an
ESS20B31-02. This means that the flagpole is 20 feet tall with a .125 wall and a 3" butt diameter. The
wind zone is this area is mild and this commercial grade aluminum flagpole has plenty of tolerance to handle the stress of the flag. We upgraded the flagpole with various parts including a
revolving truck. But we'll cover that in later parts of this tutorial series.
If you are still looking for a flagpole,
click here for a great guide!
 |
| After |
We are talking about the critical step of
flagpole installation, the
foundation. Wind loads are calculated based on the flagpole's butt diameter and wall weight or thickness. However, this assumes the flagpole is in a sturdy base. We can tell you what a flagpole is rated for,
CLICK HERE (fill out the
FLAGPOLE FINDER). But this rating is only as good as the foundation it sits on. We will show you how to
determine a proper flagpole base dimension as well as how to setup and finish the hole.
Things to keep in mind when preparing the hole
How do you figure out what size hole you need to dig for the flagpole? How many bags of concrete will you need? How much sand (if you are doing a standard in-ground installation with a corrugated foundation sleeve)? Do you need to worry about
electrolysis or galvanic action? Believe it or not, all of these questions need to be answered before you dig your hole. But we have some clever ways of figuring it out.
The flagpole hole is beveled (notice the diagram above). This means that the flagpole hole has a different dimension on the top as it does on the bottom. The bottom is typically narrower than the top. Manufacturer recommends 3” of rock at the bottom of the hole. We did not show this in the video, but it is something we do as well. Lastly, it is important to dig the hole evenly all the way around. It will help for centering, the pedestal base and for the flexibility while leveling.
Making a professional pedestal out of a Sonotube form
Sonotube is a heavy cardboard corrugated cylindrical sleeve which acts as a form. Sonotube is a great way to finish the flagpole with a pedestal. The pedestal base prevent lawn mowers or other vehicles to hit and dent the flash collar. This keeps your flagpole looking like new. The pedestal also is a great way to set up for water run-off. More on that later.
Once you have dug the hole with the correct dimensions, even all the way around, it is time to cut the sonotube. You want the sonotube to be about 6” deep. For back-fill around the base of the flagpole, garden plants require 6 inches but grass only needs about 3 inches. With a string you can make a guideline and saw the cardboard tube. This tube acts as a form at the top of the foundation. This will also allow you to plant grass, or other plants around the pedestal base.
Making concrete Foundation

All it takes to make concrete is water and concrete mix. The best way to mix concrete is in a container close by the hole you want to fill. In this video, we used a plastic tub, but you can also use a wheelbarrow. It is fairly simple to mix concrete, however, just the right amount of water and concrete mix will give you a beautiful base which lasts a life-time. It is important to use concrete. Mortar will not have the bonding agents you need for a sturdy flagpole foundation. Also, use a bucket to measure and control how much water you are adding. Use a study handled shovel or spade. Wear gloves and other safety gear as necessary.
It is good to start small. Add a little bit of water at a time. As you add the water, fold the concrete carefully as to not create too much dust. If the concrete is clumpy, add more water. If there is a layer of water across the top, you've added too much. The rule of thumb is about 5 pounds of water to an 80 pound bag of concrete mix. But this will very on the type of mixture you have.
Pouring concrete and leveling

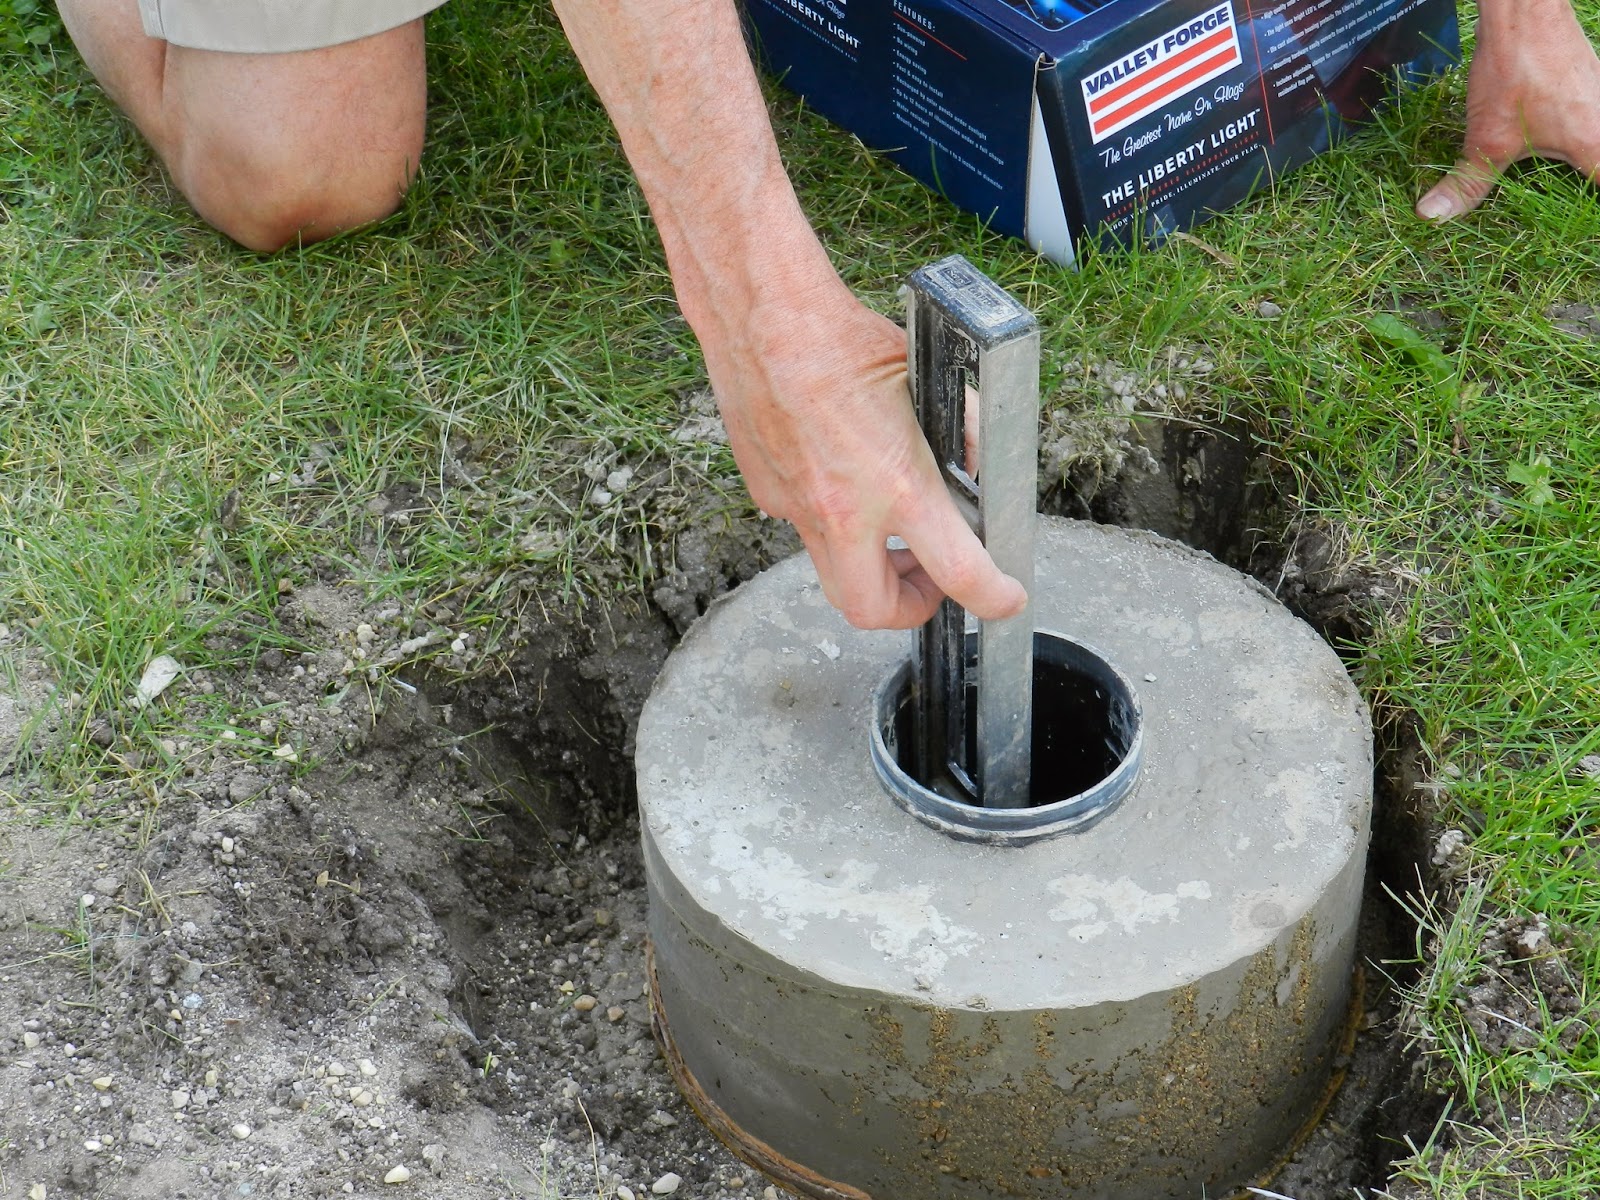
Place the foundation in the center of the hole. As we mentioned before, you can use rocks at the base of the hole to hep for drainage and leveling the foundation sleeve (steel foundation sleeve or PVC foundation sleeve). Once the sleeve is in place, carefully begin pouring concrete around the sleeve. The more concrete you use, the more difficult it will become to level the sleeve. It is important to continue checking that the sleeve is level. Also be careful to not get concrete into the sleeve itself. Getting a little concrete in the sleeve will not ruin the foundation, but a lot will. Six (6) inches from the ground level, add the sonotube form (or however long you cut the form). You will have to center the sleeve and the form for the pedestal. Center the form to the sleeve so that the distance between the form and sleeve is the same all the way around. Also level the sleeve to the ground making sure it is not tilted in the concrete. The form for the pedestal should be slightly lower than the sleeve. This gives the sleeve a slight lip. When finishing the pedestal, you can make a slope from the sleeve to the outside edge. This will allow for water run-off.
Finishing touches
The last step is to cover the foundation for safety and to insure the concrete finish stays smooth. Clean your tools from dirty and mostly the concrete mix. You gotta keep your tools in good working order. After the foundation is dry, you can tear away the sonotube to reveal your professional pedestal which looks great, protects the flag collar and allows for water run-off. Finally, back fill in grass or flowers per the landscape.
Leave a question or visit
FlagDesk for more information.