
What type of flagpole uses a cleat?
 |
| How-To Tie Flagpole Halyard (Rope) on Cleat |
External halyard flagpoles are characterized by their ropes. The ropes on these flagpoles are found externally or on the outside of the flagpole. The other system, internal, has ropes on the inside or concealed ropes. Internal systems can use rope or cable.
All external halyard flagpoles whether commercial grade or residential have rope drawn to a cleat. But what is the best way to tie that halyard (rope) to the cleat? Believe it or not, this does make a difference.
The Wrong Flagpole Cleat Knot...
Why should you learn the proper knot? You might be in a high-wind area, you might have a flagpole mounted to an edifice or wall, or you might just want a clean look. Taking care of your flagpole takes care of your flag. We've seen it all. Some of the flagpoles throughout the country we've visited have rope tied in such a way that you can play the flagpole like an upright bass, the only way to fix it, would be to cut the line off. Other problems which are more common from a bad knot:
- It creates slack in the line, resulting the the flag flying far away from the flagpole
- It loosen over time and even come off the cleat resulting in the flag coming down
- It makes it very difficult to undo in order to raise and lower the flag
The Proper Flagpole Cleat Knot...
Follow these steps to tie a secure, clean knot to the cleat at the base of your flagpole. We will also show you why this is the best method. A cleat knot is very basic, but easy do incorrectly. The rule of thumb is to keep the stress at the feet of the cleat and not on the hitch. The hitch can back out. That will cause the slack in the line. Goal is a clean look, strong hold, and easy to untie and re-tie later.
- Step 1: Pull flagpole halyard (rope) taught against the feet of the cleat
- This is very important. The rope needs to be taught (not to the point of the rope snapping - mind you). The rope has a natural stretching character. Over time the flagpole halyard will expand slightly. A taught rope now, will offset that stretch.
- Step 2: Wrap flagpole halyard (rope) around bottom cleat

- Keep the rope taught. This is the first point of the knot where the stress will sit. (Remember - do not cross the rope over the cleat before you wrap the feet!)
- Step 3: Pull flagpole halyard (rope) taught upwards against both cleat feet
- This step will put all the stress into the feet of the flagpole cleat. From here you make a cross to tie off the line. (If you place your fingers against the rope at the top cleat, you will find you can back the rope off the following steps and the line holding the flag will not loosen.)
- Step 4: Wrap flagpole halyard (rope) down and cross in front of cleat
- Crossing the cleat starts the tie-off step. (Yes, this technique is proper for all types of cleat applications like boating, docks, and theater stages.
- Step 5: In opposite direction wrap flagpole halyard (rope) underneath cleat and cross
- Keep the rope taught, but it is not as important at this point. At this point the stress points of the knot have neutralized tug. You will find once you wrap the feet of the cleat, cross, you will not feel the tug of the flag as it pulls on the system in the wind. This might not be as important for the residential applications, but it is very important for a 50 ft. flagpole mounted 144 ft. in the air!
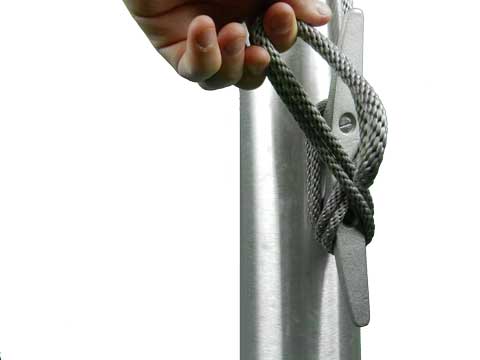
- Step 6: Make a loop in the flagpole halyard (rope) - end is behind cross

- This is very simple but very difficult to explain. The loop has to have the end tucked between the rope and the flagpole. This way when you pull the loop over the top of the flagpole cleat, you can tug on the end and tighten the knot closed.
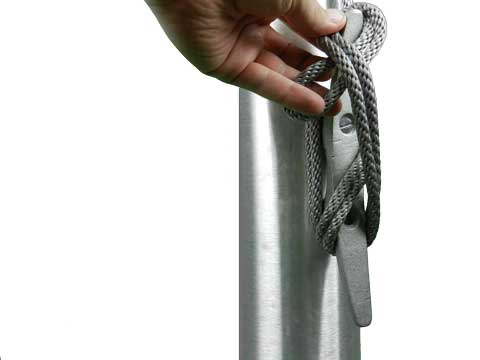
- Step 7: Pull loop over cleat top
- This is the end step to tie off the cleat. Make sure the rope does not back out around the bottom foot of the cleat as you do this. The amount of halyard on this demonstration is not a lot. Most cases will have more halyard. You can cross wrap the cleat as needed before tie-off or you can cut the halyard and re-tie shorter. If your flagpole is located in a high-wind area, more halyard will help give you leverage.
- Step 8: Pull end down taught
- You shouldn't have to pull very tightly to finish the cleat knot because the stress is taken around the cleat feet during the first few steps.
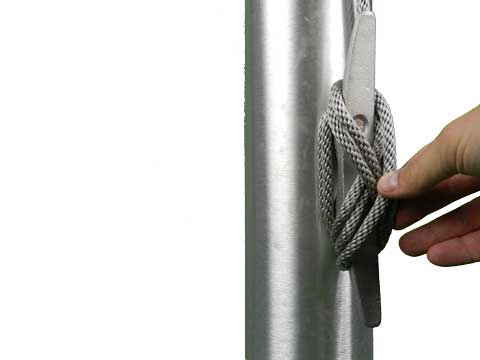
- Step 9: Tuck flagpole halyard (rope) as needed
- Now the flagpole halyard is completely tied-off. You can tuck the tail end of the halyard back into the cleat for a clean finish.


Flying your flags properly gives you longer flag life, a better appearance, and reflects the message of a what it means to be a flag flyer.
Need to know the length, thickness, color, or style for the best halyard (rope) for your flagpole? Use the Flagpole Identifier.
If you have any questions or comments, let us know. We just like people who fly flags.